
An autonomous, solar powered Raspberry Pi with camera and cellular connectivity is a useful application for timelapse photography and remote monitoring. In this post we will show you how to set up and program your Raspberry Pi so that it will wake and sleep on a schedule and do the following upon bootup:
- Take a picture
- Send picture to the email your choice over the cellular network
- Turn off to save energy
We’re able to run this system using only a small 1 Watt Solar Panel and our V15 Always On Battery Pack. A real-time clock allows us to greatly reduce the power the Raspberry Pi application consumes. The setup below runs for about 10 minutes per day and consumes less than 0.5 Watt-hours per day. Without a real-time clock, the system would a similar system would use 48 Watt-hours per day and could require a 40 Watt panel to run continuously throughout the year. An IoT Battery Pack is important because most battery packs shutoff when they aren’t delivering any power. Voltaic batteries have an Always On mode and stay on even when there is no or little current draw.
Power Consumption With and Without a Real Time Clock
| Raspberry Pi B 2.1 | Voltage (V) | Current (A) | Power (W) | Watts/day (Wh) |
| ON (24hrs) | 5V | 0.4 A (avg) | 2.0 W | 48.0 Wh |
| On 10 Minutes w/ Witty Pi | 5V | 0.5 A | 2.5 W | 0.4 Wh |
Parts Needed for Solar Raspberry Pi Camera:
- Raspberry Pi [Preferably a model with USB Type-A (if you only have one USB port, you can use a usb-hub.
- Raspberry Pi Camera
- Witty Pi Mini
- Nova Global Cellular Modem
- Global IoT SIM Card
- V15 USB Battery Pack
- 1 Watt Solar Panel
- HDMI Cable for Interface
System Setup: Camera
We used Raspbian OS Version June 2019, Kernel 4.19. Once you have the Pi up and running with Raspbian, the next item to set up is the camera. To install the camera, shutdown your Pi and install the camera into the slot between the HDMI and Ethernet ports.

Once you have boot up, open a terminal window and run the command: pi@raspberrypi:~ $ sudo raspi-config
If there is no camera option on the displayed menu or under: Interfacing Options, hit finish and run the following two commands (this may take a couple minutes):
| pi@raspberrypi:~ $ sudo apt-get update pi@raspberrypi:~ $ sudo apt-get upgrade |
Now call the raspi-config cmd again: pi@raspberrypi:~ $ sudo raspi-config
Select the Menu/Interfacing Options/Camera/<Yes> and Enable the connection to the Raspberry Pi Camera
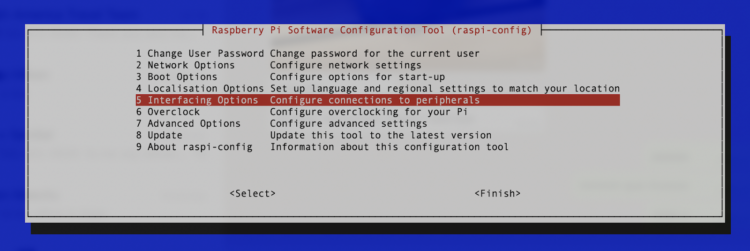

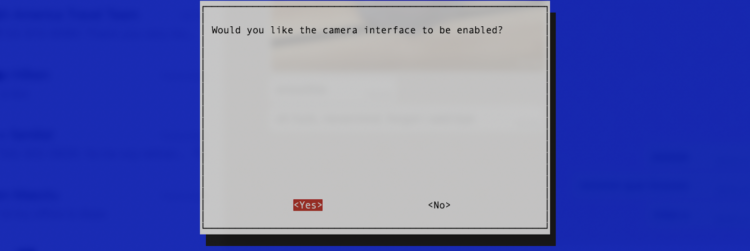
After you have selected <Yes>, select <Finish> and reboot your Pi.
System Setup: Email
Now we will move on to install the necessary software needed for enabling outgoing mail from your Pi. Open a terminal window and run the following:
| pi@raspberrypi:~ $ sudo apt-get install ssmtp pi@raspberrypi:~ $ cd pi@raspberrypi:~ $ nano snap_and_send.py |
The following code was open source code originally written by Ravishankar Velladurai. We have edited it to work for our purposes. Copy this code and edit the highlighted lines accordingly.
| import smtplib,ssl import time from picamera import PiCamera from time import sleep from email.mime.multipart import MIMEMultipart from email.mime.base import MIMEBase from email.mime.text import MIMEText from email.utils import formatdate from email import encoders timestr = time.strftime(“%m, %d,%Y – %H:%M:%S”) print timestr #data_folder = Path(“/home/pi/photos/”) camera = PiCamera() camera.start_preview() sleep(5) camera.capture(‘%s.jpg’ % timestr) # image path set sleep(5) camera.stop_preview() def send_an_email(): toaddr = ‘xxxx@gmail.com‘ # To id me = ‘xxxx@gmail.com‘ # your id subject = “Photo of the Day” # Subject msg = MIMEMultipart() msg[‘Subject’] = subject msg[‘From’] = me msg[‘To’] = toaddr msg.preamble = “test “ #msg.attach(MIMEText(text)) part = MIMEBase(‘application’, “octet-stream”) part.set_payload(open(“%s.jpg” % timestr, “rb”).read()) encoders.encode_base64(part) part.add_header(‘Content-Disposition’, ‘attachment; filename= “%s.jpg”‘ % timestr) # File name and format name msg.attach(part) try: s = smtplib.SMTP(‘smtp.gmail.com’, 587) # Protocol s.ehlo() s.starttls() s.ehlo() s.login(user = ‘xxxx@gmail.com‘, password = ‘your_email_pass‘) # User id & password #s.send_message(msg) s.sendmail(me, toaddr, msg.as_string()) s.quit() #except: # print (“Error: unable to send email”) except SMTPException as error: print (“Error”) # Exception send_an_email() |
To correctly save the file,
- Ctrl + O
- return/enter
- Ctrl + X
In order for the photo to be sent using the SMTP protocol, you must authenticate Gmail’s SMTP server to allow less secure apps. This is done as follows:
- Login to your Gmail
- Go to “My Account“ → “Sign-in & security” → “Connected apps & sites”
- Now find “Allow less secure apps” and turn it “On“.
To test if the script works, on a new terminal window, you can run the code below and check for an email with the subject: Photo of the Day
| pi@raspberrypi:~ $ sudo python snap_and_send.py |
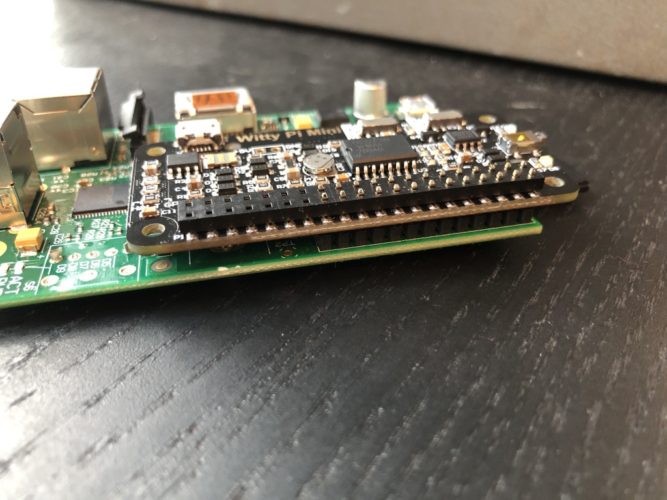
System Setup: Witty Pi Mini Real-Time-Clock
Now that the camera and email script are all ready, we can dial in on the scheduling and power management systems. This will allow us to reduce the power consumption and dramatically reduce the solar panel and battery size required to run the system in perpetuity.
As mentioned earlier, we are using a Witty Pi Mini as the main power controller for this project. The Witty Pi Mini has a Real-Time-Clock (RTC), a Power Management system, and a very convenient on/off button that safely powers off the Pi. This piece of hardware allows us to draw 0.00 A when the Pi is powered off and also gives us the ability to program the wake/sleep schedule of the Pi.
Hardware Setup: Make sure your Raspberry Pi is off.
Mount the Witty Pi Mini onto the Raspberry Pi. The best way to connect your Witty Pi Mini to your Pi is with a Stacking GPIO Header. Insert in the pins accordingly and power the Witty Pi by using the Pi’s Micro USB cable.
Make sure that both the Default and D. Load switches are off.

Software Installation/setup: Once it boots up, open a terminal window and run the following:
| pi@raspberrypi:~ $ wget http://www.uugear.com/repo/WittyPi2/installWittyPi.sh pi@raspberrypi:~ $ sudo sh installWittyPi.sh |
Now, reboot your Pi by pressing the mechanical button on the Witty Pi Mini! Once rebooted, run the following:
| pi@raspberrypi:~/wittyPi $ sudo ./wittyPi.sh |
This executes the wittyPi.sh script and runs the program that allows the device to be programmed. It should look something like this:

The software is preloaded with sample schedule scripts that you can use or, using a script generator, you can customize your own.
First select 3 so that your Pi and Witty Pi Mini are synchronized and are reading the same time. (This is very important)
System Setup: Raspberry Pi Cellular Connection with Hologram
The most important part of an IoT device is its ability to connect to the internet. We have used a Hologram Nova–usb cellular 3g/2g modem to act as our network gateway.
We followed this guide to setup my Hologram Nova device but we will go a bit more depth, as we feel that some steps were missing.
Activate your SIM:
Turn off your Pi, eject the SD card, and insert into your computer. Proceed by following these commands on a new terminal window:
| Usr-MacBook-Pro-452:~ usr$ cd /Volumes Usr-MacBook-Pro-452:~ usr$ ls Macintosh HD RECOVERY boot Usr-MacBook-Pro-452:~ usr$ cd boot (a list of files should appear)Usr-MacBook-Pro-452:~ usr$ touch sshUsr-MacBook-Pro-452:~ usr$ sudo nano wpa_supplicant.conf |
Copy the following code into your wpa_supplicant.conf file and edit it.
| country=US ctrl_interface=DIR=/var/run/wpa_supplicant GROUP=netdev update_config=1 network={ ssid=“**your-wifi**” psk=“**your-password**” key_mgmt=WPA-PSK } |
Put the SD card back into the Pi and boot it up. If your Pi has ethernet capabilities, keep it connected that way.
By using ssh or opening up a new terminal window, download/install the Hologram Software:
| pi@raspberrypi:~ $ sudo apt-get update pi@raspberrypi:~ $ curl -L hologram.io/python-install | bash |
If the install was successful, plug in the NOVA and wait for a solid red light and a blinking blue light.
What the commands do by line #:
- Prints the version of the device
- Prints the location of the device in long/lat format
- Sends a message “Hello World” to the cloud so be sure to check the Hologram API
| pi@raspberrypi:~ $ sudo hologram version
pi@raspberrypi:~ $ sudo hologram network connect pi@raspberrypi:~ $ sudo hologram modem location pi@raspberrypi:~ $ sudo hologram send “Hello World” |
In order for the NOVA to connect automatically on startup, you will want to write a simple script that connects the pi to using 3G/2G.
Go to your home directory on terminal by typing:
| pi@raspberrypi:~ $ cd |
Now create a new nano file named connect.sh:
| pi@raspberrypi:~ $ nano connect.sh
//copy the script below and exit #!/bin/bash |
System Setup: Script on Bash-Startup Script
The last part of the software setup is to add two lines to the end of the Pi’s custom startup bash script to run the connect.sh and snap_and_send.py scripts at Boot!
Add the following line to the end of the script and before exit 0
| bash /home/pi/connect.sh python /home/pi/snap_and_send.py |
Again, to save/exit: Ctrl + O, enter/return, Ctrl + X
Solar Installation and Mounting:
To install the Voltaic 1 Watt 6V Solar Panel into the system, you will want to connect its built in Micro-USB Wire to our Voltaic V15 Battery Pack. Now grab any USB A 2.0 to Micro USB cable and connect the battery pack to the Witty Pi Mini Micro-USB input. Find a complete fritzing diagram below.
This part of the setup is completely optional and can be done by preference, but here are some photos of our packaging. We use a
WaterProof Pelican Case and packing foam to nicely bundle all the components.

We mounted the case with battery and panel directly onto a pole with cable clamps.
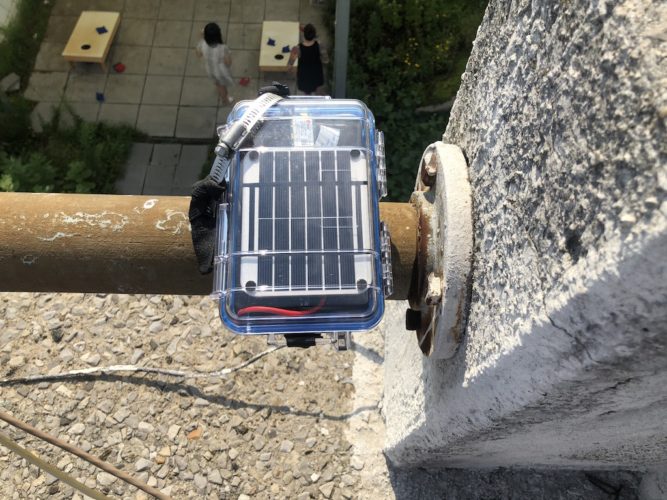
Here is one of the daily photos of the sunset.

Fabulous article.
My project is for close range, on water and would need also
1) flash I expect, possibly
2) 4g /sim
3) an electromagnetic gate
4) Heat sink
5) flexible solar panel arrangement
6) Water resistant case
I know the new pi’s have more connectivity and there’s all sorts on the hut, but as you’ve done such a great job I wondered if you had any words of wisdom?