In this article we evaluate three popular lithium ion solar charge controllers, with and without MPPT, and compare their performance with a variety of different size panels in different lighting conditions.
Evaluation of Three Lithium Ion Solar Charge Controllers
Charging batteries or powering devices through a solar panel is very different than having a continuous supply of DC current, such as through an AC adapter. Solar panels’ power output (Voltage X Current) vary based on the amount of solar intensity and temperature. We visualize this characteristic of each solar panel through something called an IV curve, which shows how much current a solar panel can provide at a specific voltage and specific solar intensity (irradiance). Take the graphic below for example:

This is a generic set of IV curves for one panel, where the colored lines are the different solar intensities. From an IV curve, we can derive the power output (since P = IV) and the maximum power of a solar panel is right at the bend in the IV curve, marked by a star on the graph. This is the point where the system should operate to get the most out of the solar panel. MPPT stands for maximum power point tracker and as the name suggests, its goal is to track the MPP in all light conditions because it shifts with irradiance – the black line.
Adafruit vs. Sparkfun Sunny Buddy vs. TI MPPT
The Adafruit Solar Lipoly Charger doesn’t have MPPT, while both the other charge controllers tested do. Adafruit’s design notes give some documentation on why: higher cost, comparable efficiency, etc. Here is a comparison chart of some of their relevant specifications:
| Adafruit Solar Lipoly Charger | Sparkfun Sunny Buddy | TI bq24650EVM-639 | |
| Cost | $17.50 | $24.95 | $99 |
| Chip | MCP73871 | LT3652 | TI bq24650 |
| Input Voltage | 5.5-6V non-adjustable | 4.95-32V adjustable | 5-28V modifiable |
| Input connection | Barrel jack 5.5×2.1 | Barrel jack 5.5×2.5, screw terminals | Screw terminals |
| Output connection | JST | JST, screw terminals | Screw terminals |
| Battery Float Voltage | 4.5V | 4.4V | Modifiable up to 26V |
| Max Charge Current | Default 500mA
Modifiable up to 1A |
Default 450mA
Modifiable up to 2A |
8A |
| Supported Battery Types | 3.7/4.2V 1-cell Li-Ion/Polymer | 3.7/4.2V 1-cell Li-Ion/Polymer | Li-Ion/Polymer, LiFePO4, Lead Acid |
Test Setup for Lithium Solar Charge Controllers

The experiment has two variables: irradiance and panel size. Voltaic’s 1, 2, 3.5 , 6, and 9 Watt panels were used. Each panel is connected through a USB multimeter (we used the YZX ZY1270 and ZY1266) into the solar charge controller, then through another USB multimeter and into a 3.7V lithium polymer cell. We measured the current and voltage in each setup to see how each solar charge controller performs with a specific panel size and under a specific light condition. From these measurements, we can calculate the power output and the efficiency of the module.
Voltaic has a full range of solar panels for prototyping and deployment.
Results
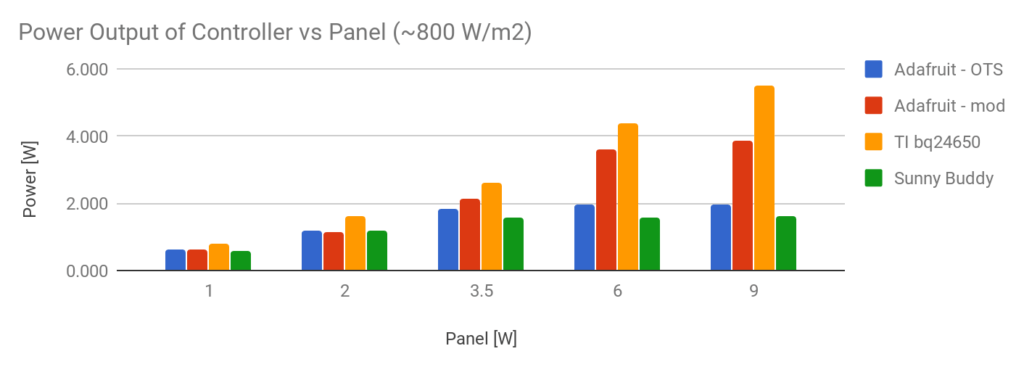
In the tests in bright light, the TI module outperforms the rest. However, it is important to keep in mind that past the 3½W panel, the Adafruit Over the Shelf (OTS) and Sunny Buddy hit their programmed current limits and cannot provide any more power. Similarly, the modified Adafruit board hits its 1A limit with the 9W panel. If the current limit for the Adafruit is enhanced to 1A, its power output is doubled at the 9W panel. It’s important to keep in mind the limitations embedded into these boards when comparing them to one another.
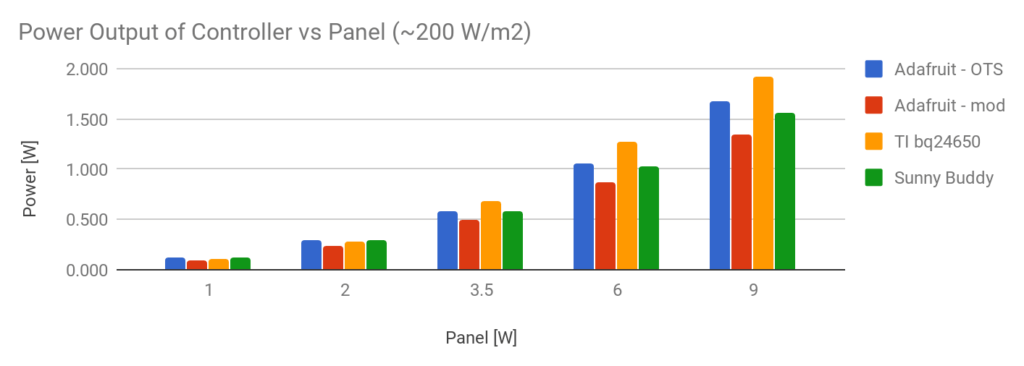
In medium light, the TI module still performs well, but it’s interesting to note how the two different Adafruit chargers vary in these two situations. In bright light, the modified version (1A max) beats the off-the-shelf (500mA max), while in lower light it’s reversed. The current limit is no longer a factor and so this is a fair light condition to test the controllers in. The Adafruit and Sunny Buddy have comparable performance.
In both situations, note how the trend among the panels remains consistent, with all the power outputs varying in consistent ratios from panel to panel.
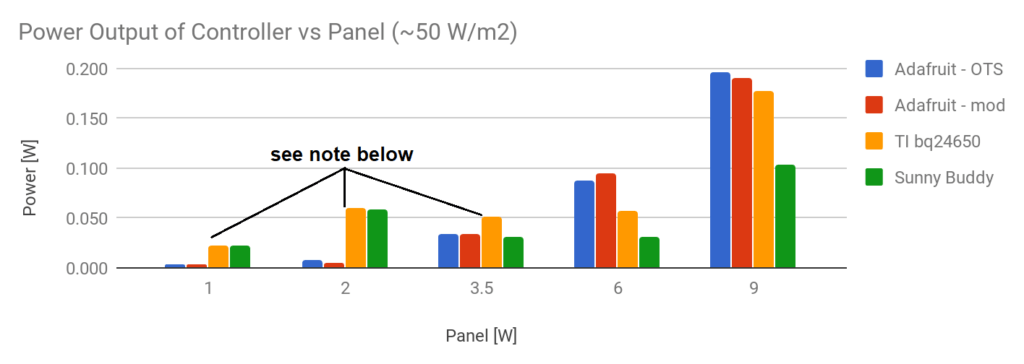
The 1, 2, and 3½ Watt panel results from the dim-light graph are unreliable because the power output was so low that the USB multimeter readings were out of their accuracy range. Although current is likely flowing into the battery, the amount was hard to measure as the USB multimeters themselves draw current. We estimate that the input to the battery was less than 6 mA. In this additional low light condition, the Adafruit OTS continues to do well as the current limit never comes into play. The Sunny Buddy performed more poorly than expected, but it’s a possibility that the potentiometer should’ve been adjusted in the dim-light setting to account for the lower MPP voltage.
Solar Charge Controller Recommendations
Adafruit Solar Lipoly Charger

The Adafruit is the cheapest, but it does have certain modifications you can make to improve the efficiency and power output. One limitation of the board is that it has a set battery float voltage, at 4.5 volts. This is certainly enough to charge most single-cell lithium-polymer batteries, but it isn’t optimal in all situations. Secondly, there is a current limit that is 500mA off the shelf, but modifiable up to 1A if a 2kΩ resistor is connected across the ‘PROG’ pins. Because of the current limitations, it restricts the power output and efficiency of the Adafruit board in situations with greater irradiance and/or larger panels. Yet at the same time, we see that modifying it reduces its power output in lower light conditions.
Because of its low price, consistent power output, and clear documentation, the Adafruit Solar Lipoly charger is a strong choice for those looking for an easy off-the-shelf solar charge controller that needs little to no modifications and is an all-around performer.
Sparkfun Sunny Buddy

The Sunny Buddy has similar limitations to the Adafruit board. Its default current limit is at 450mA, but it can go up to 2A. The pro of the Sunny Buddy is that there is an adjustable voltage input regulation setting which can be changed by turning an on-board potentiometer. Essentially, the MPPT point is set manually beforehand and the hook-up guide shows how to do this. This customization is a form of MPPT tracking but as the Adafruit design notes stated, it didn’t result in an increase in performance, just in cost. It’s worth noting that also similar to the Adafruit design it has a 4.4V battery float voltage.
The Sunny Buddy has a better power management and battery charging chip, the LT3652. The board is also mostly unpopulated, allowing for more custom connections beyond the barrel jack and JST connectors. For someone willing to delve into the LT3652 datasheet, this is a strong board because of its larger range of features, such as termination schemes and fault detection.
TI bq24650EVM

Finally we have the TI board, which allows modifications on both the input and output voltage sides. It has the most technical freedom since it is an evaluation module, though using it can be cumbersome. It requires diving into the datasheet to figure out which resistors to use for which panel voltage or battery float voltage, and then connecting them onto the evaluation module. However, the results are remarkable, with the highest power output in almost all situations. The benefit of this board, besides the obvious, is its flexibility, allowing a range of solar panels and the ability to charge many battery types, even multiple cells in series. It has a high efficiency and a whopping 8A maximum current.
The bq24650EVM (evaluation module) is not for beginners. Despite its stellar power output and its ability to accommodate almost all solar charging combinations, it is both expensive and complex.
Conclusion
Powering outdoor electronics project through solar isn’t always easy, but with one of these solar charge controllers it’s definitely easier. Combined with a good panel, a strong solar-powered system could be optimized to achieve maximum power in a variety of light conditions and thus increase its longevity and reliability. We hope that this article has been informative to both newcomers and veterans of solar-powered projects, and good luck!
If you want to talk to a Voltaic expert about continuously powering sensors or other IoT devices from solar power, schedule an IoT Consultation here.
Do we really need a dedicated solar power charger (like MPPT) to charge the lithium battery? Can we use a normal lithium battery charger to charge it? I guess there are differences in terms of efficiency?
You certainly do not need MPPT. The Adafruit charger does not have MPPT and it works well as do our current versions of the V15 and V44. What we show is that the MPPT outperforms the non-MPPT charger in some situations, but often adds some cost and complexity as well. It very much depends on your design constraints (space, power consumption, cost).
Hi,
Excellent article thank you very much !
Would it be possible to have the raw values you collected and used to draw the graphs above?
Thanks again!
Excellent article! Thanks Voltaic!
Adding further to the info, the MCP73871 comes in at around $2, the BQ24650 at $3.5 and the LT3652 at $5.5 in volume. So for those designing custom boards the additional cost of the BQ might be worth it.
Definitely food for thought when designing our next low cost IOT device.