
Solar Powered License Plate Recognition
The goal of this project was to power and operate the Einar License Plate Recognition (LPR) camera with Voltaic’s new solar system, which integrates a LiFePO4 battery and charge controller into a single, lightweight enclosure (with PoE injector and remote monitoring add-ons available).
Big thanks to Adaptive Recognition for their support with this project.

To provide the Einar with cellular connectivity, we used a UR41 Mini Series Industrial router from Milesight paired with a SIM card from 1NCE. We chose the router for its small form factor and low-power mode.
In this post, we’ll cover:
- The system diagram and overview
- Power Consumption and System Sizing
- Connecting to Einar Remotely
- The PoE Injector
Parts we used:
- Voltaic 200W 100Ah Solar Power System
- with PoE add-on
- comes with 2 outdoor rated CAT 5 patch cables
- note: better to use ethernet cables without a strain relief boot so that the waterproof bulkhead fits over them. It won’t fit all booted ethernet cables.
- Fence to mount to
- 1/4-20 wood screws
- Power drill
- Einar camera
- comes with mounting bracket
- 1/4-20 wood screws
- UR41 Router from Milesight
- waterproof enclosure
- waterproof PoE bulkead
- waterproof PG11 gland for power cable
System Diagram & Overview
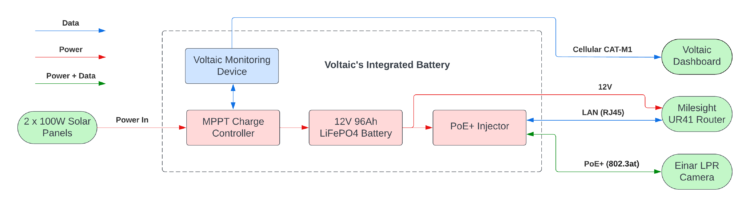
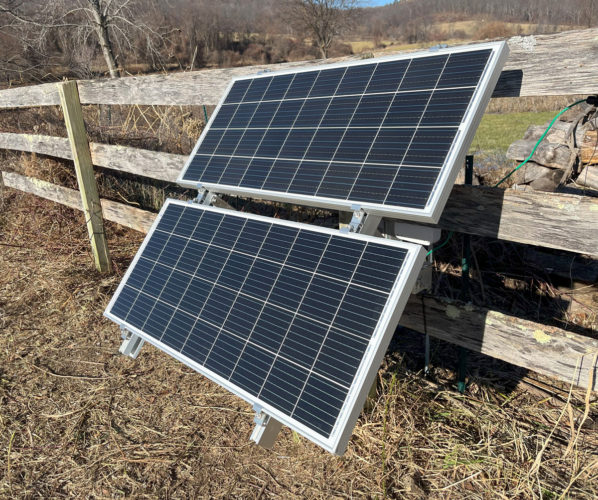
Our system begins with two of Voltaic’s 100W solar panels plugged into our integrated battery (one MC4 input for positive and one for ground).
The panels feed into a high-efficiency (up to 97%) MPPT charge controller. The charge controller tracks the MPP voltage of the solar panels and protects the system from short-circuits, high or low voltages, and unsafe temperatures.
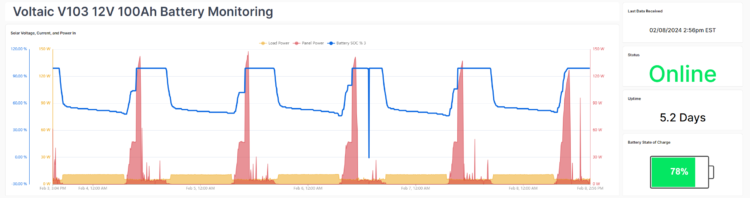
The charge controller sends data about battery health and environmental conditions to the Voltaic Monitoring Device, which uploads data via cellular to our dashboard. This device is available as an add-on to the integrated battery for those needing data on solar power produced, power consumed by the device, battery voltage, battery temperature, and any fault conditions triggered.
The 12V output (unregulated 12.4-14.4V) powers both a PoE injector in the battery and the router outside.
The UR41 router from Milesight was mounted inside the waterproof Voltaic E307, which was fitted with a PG13 waterproof gland for the 12V power cable and an Ethernet gland for data.
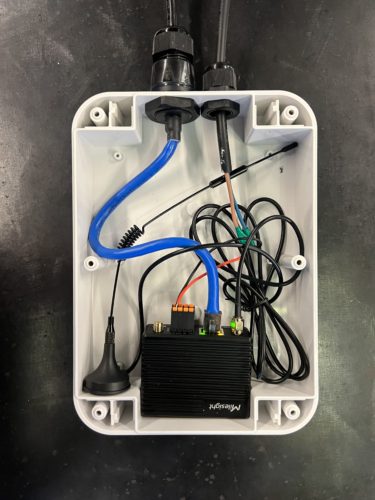
The Milesight router also varies in its consumption. Idling, it pulls 1.2W. Streaming 4K video, it pulls closer to 2.4W. It also has a low power standby mode, which can bring the power consumption as low as 0.2W. The router is essentially off in this mode, only awaiting triggers to wake it up (internal or external).
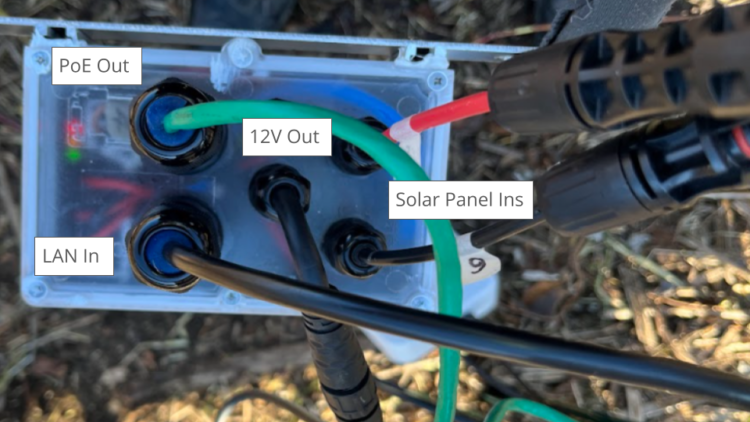
Finally, PoE is fed out to the Einar. In short, the battery connections are:
In
- LAN from Milesight router
- Positive from panels
- Negative from panels
Out
- 12V unregulated (to stripped ends)
- PoE+ out
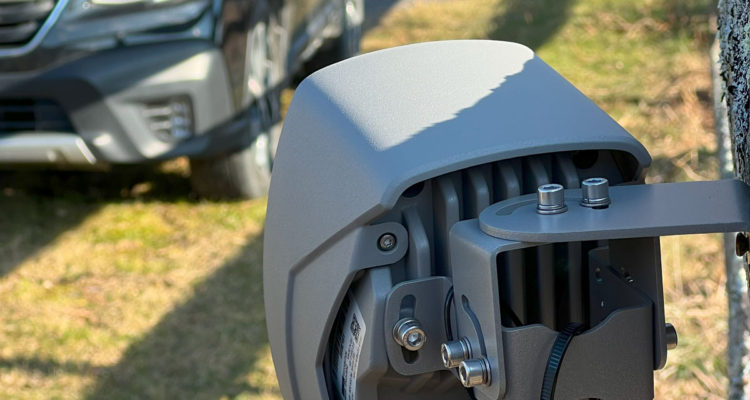
This picture shows our battery in the field with all the ins and outs connected. You’ll notice three indicator lights on the charge controller that give you status updates at a glance.
Power Consumption & Sizing
There are three components drawing power here:
- Einar — 4W or 11W
- Milesight Router — 1-2W
- PoE Injector — 0.3-0.5W
In our benchtop testing, the Einar consumed 5W in daylight and 10W in the dark. It has infrared LEDs that allow it to scan license plates at night and consume a fair bit of power (they need to be bright). The camera also has an internal heater that kicks in at 0°C, which we did not measure consumption for on the bench.
Note: Einar only pulls 4W after the latest firmware and NLPR engines have been uploaded. As far as we could measure, detecting plates does not effect the power consumption (the engine is always running).
The Milesight router also varies in its consumption. Idling, it pulls 1.2W. Streaming 4K video, it pulls closer to 2.4W. It also has a low power mode, which was not qualified here.
The PoE injector self-consumes a steady 0.5W when the camera is connected. Without a load, it has a standby power draw of 0.3W.
System Sizing
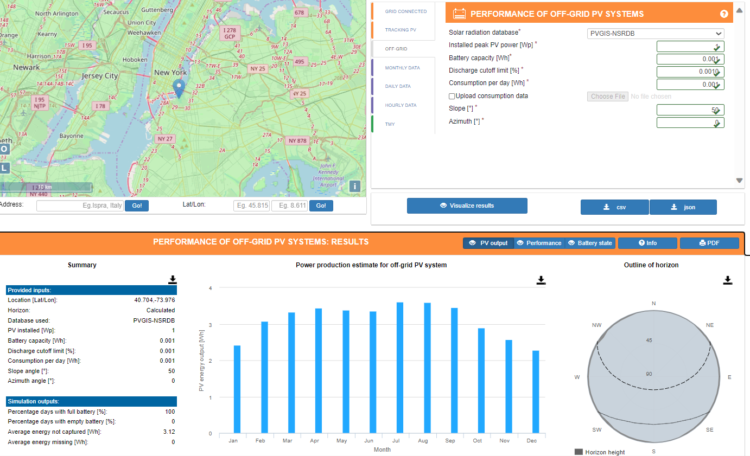
In total, the system power consumption varies from 6.6W to 11.7W between day and night. The shortest day in New York City (December 21st) is 9h 15m. In that 24h period, our system would consume 233Wh.
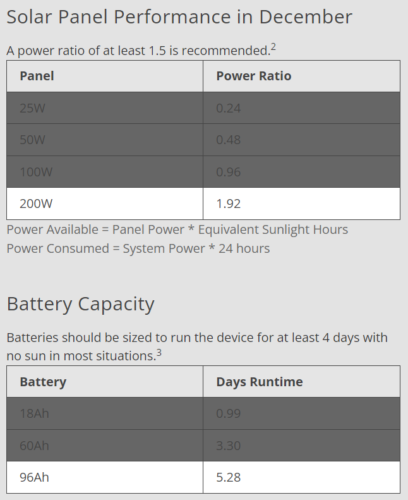
On an average December day, a south-facing solar panel tilted at 50 degrees sees the equivalent of 2.2h of direct sunlight in New York City. A 100W solar panel would generate 220Wh before losses, which is insufficient. We chose to power the system with 2 x 200W solar panels to ensure constant uptime in the winter.
The rule of thumb for battery sizing is in the range of 3-7 days. In sunny Florida, 3 days is often sufficient, while somewhere with extended cloudy weather, like London should be closer to 7. Our deployment is in upstate New York.
Given that batteries lose capacity and efficiency in cold weather, our 60Ah (768Wh) battery would provide less than three days of power to our system. We selected our 100Ah battery because it provides around five days in this case.
Connecting to the Einar Remotely
This section skips over the basics, like PoE injectors and initial router setup. To connect to the Einar remotely, we connected it to the Milesight router’s LAN, used a VPN to access the router’s local network, then were able to access the camera’s local IP via DHCP .
The first step is to make sure you can connect to the Einar on your LAN. Either connect to the camera with ethernet through a PoE injector or connect the camera to your WiFi router or modem. Download the AR Device Tool off the Einar site and the camera should show up immediately if you’re on the same LAN.
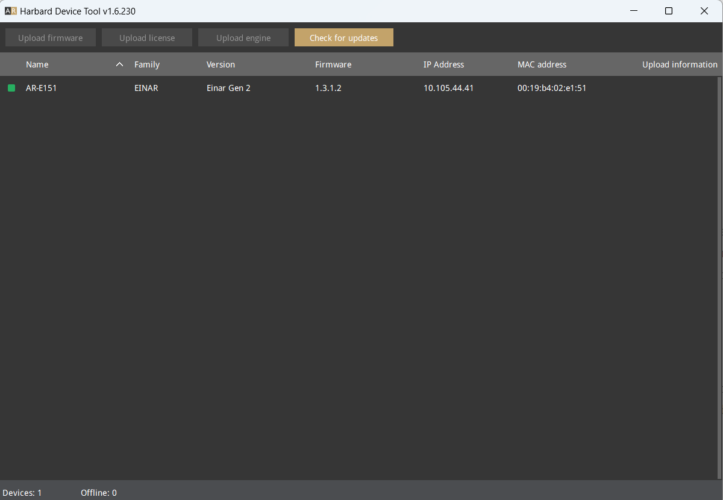
-
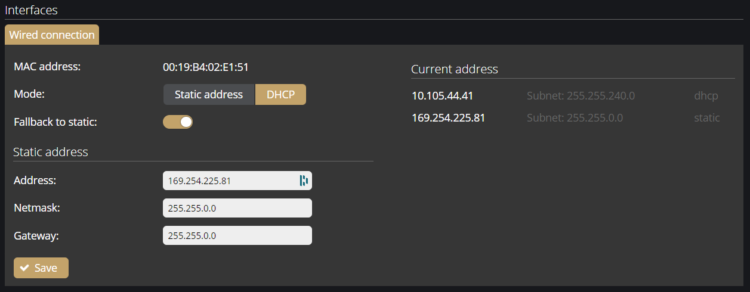
- In the portal, go to Settings > Network > Mode > Change to DHCP > Click Save. Note the MAC address of your Einar device. We’ll need this later.Einar DHCP Settings
- OpenVPN
- Create an OpenVPN CloudConnexa account (yourwebsite.openvpn.com)
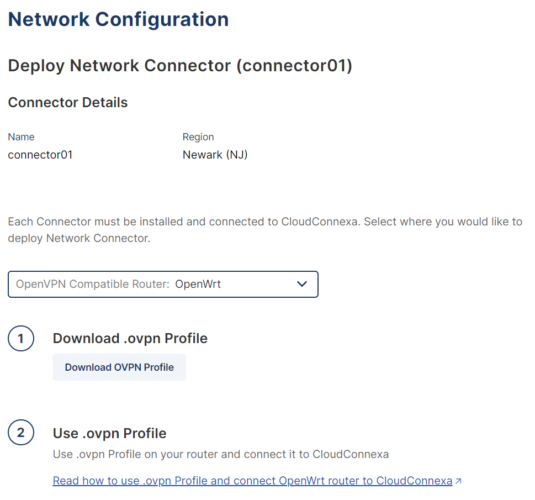
- Networks > Add Network > Remote Access > Name > Connector Type: OpenWrt (OpenVPN compatible router) > Download OVPN Profile
- Choose OpenWrt as the router type and download the OVPN profile
- Download the “OpenVPN Connect” app on your endpoint computer and connect to yourwensite.openvpn.com profile
- Router Settings
- Connect to your router locally (LAN, 192.168.1.1 was the default IP for us)
- Network > VPN > OpenVPN > Upload the OVPN file and save
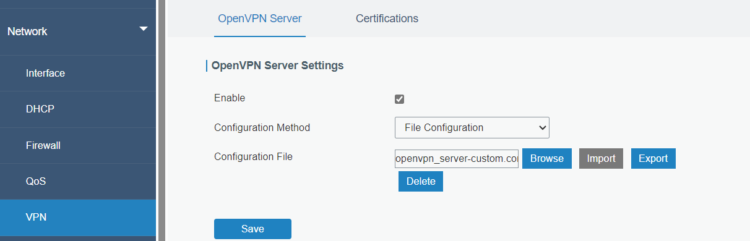
- Check Status > VPN and see that the server is enabled
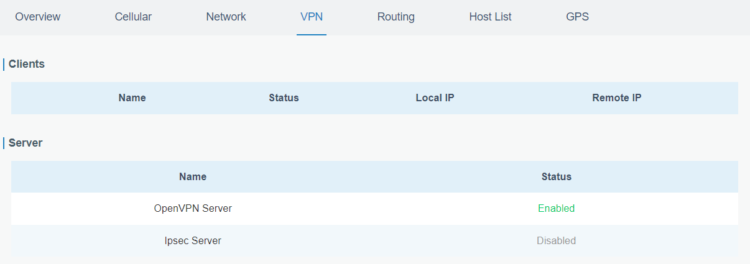
- Once the OpenVPN Server is enabled on the router and you’re connected to the VPN on your endpoint device, you should be able to access the router at 192.168.1.1 from any network. The router has to have cellular connection and a SIM card.
- Connect the Einar to your router’s LAN via PoE injector. Under Status > Routing > ARP Cache, you should see the MAC address of your Einar with an associated IP on the router’s local network.

- Type the IP address the router has assigned to your Einar into your search bar, and you should be connected to the Einar.
PoE Injector
There are passive PoE injectors that will combine a DC power input with Ethernet data and consume no power, but a high-performance device like the Einar will typically require some level of active PoE (802.3af, 802.3at, 802.3bt). Active PoE involves a “negotiation” between the PSE and powered device PD to ensure that the correct voltage is sent over the line.
For this application we required a PoE injector with the following qualities:
- PoE+ capability (802.3at)
- DC power input (10-15V input range)
- Low self-consumption
Long story short, it took a lot of searching to find an injector that consumes only 0.5W continuously (powering itself and boosting 12V to 48V). We found devices that used as much as 3W without a built-in boost converter.
This low-power PoE+ rated injector is what we have included in our VOLT battery. The injector doesn’t start consuming power until the output cable is attached, which activates the battery.
Leave a Reply