Solar Powered Edge AI Introduction
This tutorial will introduce you to an object detection application for the Raspberry-Pi (R-Pi) running with Open CV that consumes very little power. The system is designed so that the Pi shuts off in between detection events and can be powered by a small solar panel and IoT battery pack. This project will function in the following way.
- The R-Pi will turn on every 30 minutes.
- The onboard camera will take a photo.
- The photo will be passed through a neural network for object detection.
- An email containing a count of detected objects is sent to a designated email address.
- After a period of 5 minutes, the R-Pi turns off.
Raspberry Pi System Power Consumption
As in all other solar-powered applications, we must make proper power consumption estimates to select an appropriate solar panel for our purpose. The following table details all electrical loads associated with this project. The project will require a total of 4.61 Watt-hours each day. For New York City, I recommend the use of a 5.5-Watt solar panel to prevent any power supply issues year-round. If you intend on changing any parameters, it is important to recalculate and reselect an appropriate solar panel. It is also important to note that the project utilizes a photoresistor that will prevent the R-Pi from turning on at night. This means that on average the R-Pi is active over a 15-hour period each day instead of 24 hours.
| Electrical Load |
Current | Voltage | Power | Active Time in One Hour | Watt-Hours | Active Time in One Day | Watt-Hours Per Day |
| External Timer | 3 mA | 5 V | 0.015 W | 60 min | 0.015 Wh | 24 hours | 0.36 Wh/day |
| R-Pi (code is running) | 500 mA | 5 V | 2.5 W | 2 min | 0.083 Wh | 30 minutes | 1.25 Wh/day |
| R-Pi (idle time) | 300 mA | 5 V | 1.5 W | 8 min | 0.2 Wh | 2 hours | 3 Wh/day |
| Total | 0.3 Wh (average) | 4.61 Wh/day |
Required Components for Solar-Powered Object Detection
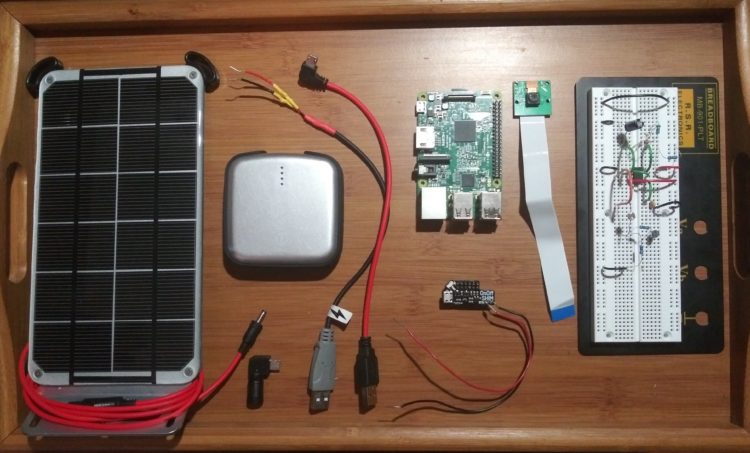
- Raspberry Pi 3 Model B v1.2
- Wi-Fi Connection (this could be done with cellular or LoRa, but we used Wi-Fi for simplicity here)
- R-Pi Camera Module v1.3 (or better)
- 5-Watt 6 Volt Solar Panel – ETFE (3.5 Watt panel is shown above)
- Female 3.5×1.1mm – MicroUSB
- V25 USB Battery Pack
- External Timer
- Soldering Equipment
- Breadboard
- USB Cable (Will require stripping unless you also purchase a USB breakout)
- Jumper Wires
- Resistors
- 8 kΩ
- 3.9 MΩ or 1 MΩ (x4)
- 100 kΩ
- 20 kΩ
- Capacitors
- 100 nF
- 440 μF
- 1N4148 Diode (x2)
- BC547ATA Transistor
- Photocell PDV-P8103
- OnOff SHIM
- External Timer (Recommended alternative *Not discussed in the tutorial)
Camera Installation
First, we need to properly install the R-Pi camera to allow us to take photographs.
- On the R-Pi, locate the port labeled “camera”.
- Lift the black bar up.
- Insert the camera cable so that the silver connectors are facing the HDMI port.
- Clamp the black bar down.

If you are using the Module v1.3 be mindful of the gold connector labeled “SUNNY”. This camera has a frequent problem with the sunny connector becoming loose while handling.
Once the camera is in, boot the R-Pi and in the terminal enter the following command:
sudo raspi-config
This will bring you to the R-Pi configuration menu where you need to do the following.
- Select “Interfacing Options”.
- Select “Camera”.
- The following prompt will appear “Would you like the camera interface to be enabled?”, select “<Yes>”
- After this select “<Finish>” and reboot your device.
Neural Network
Before we start coding in Python, we will update the R-Pi and install the necessary python libraries. The specific method of object detection used in this project was developed by Adrian Rosebrock.
Installing OpenCV
OpenCV is a specialized programming library used in artificial intelligence applications. It is central to making this whole project work. We will install OpenCV on the R-Pi using Python’s pip and the R-Pi terminal. Open the R-Pi terminal and enter these commands.
Upgrading the R-Pi
sudo apt update
sudo apt full-upgrade
Installing Python Libraries
sudo apt-get install libhdf5-dev libhdf5-serial-dev libhdf5-103
sudo apt-get install libqtgui4 libqtwebkit4 libqt4-test python3-pyqt5
sudo apt-get install libatlas-base-dev
sudo apt-get install libjasper-dev
Pip Installation
wget https://bootstrap.pypa.io/get-pip.py
sudo python3 get-pip.py
sudo pip install opencv-contrib-python==4.1.0.25
pip install imutils
pip install “picamera[array]”
Pretrained Model
Next, we need to download the pre-trained neural network. Click on the link below and scroll to the bottom of the article. You are looking for a green button labeled “Download The Code”. Enter your email here and you will be mailed a zip file. The zip file will include python codes, the “prototxt”, and the model. Place the prototxt and model in an easily accessible directory on the R-Pi. Discard the python codes. I personally use the “VNC Viewer” software for all file transfers between my computer and the R-Pi.

Enter Your Email into this Prompt
Email Setup
The R-Pi will send gathered information to a Gmail account. I would strongly recommend creating a fresh Gmail account for this project. This is because we will have to lower the security of the email account so that it can properly interact with the R-Pi.
SMTP Library
Using the terminal, we need to install the smtp library to enable functions related to sending emails. Enter the following command into your terminal:
sudo apt-get install ssmtp
Gmail Security
This is how we need to alter the security of the Gmail account.
- Go to your Google account settings.
- Under the “Security” option find “Less secure app access”.
- Enable this option.
Python Code
The python code is responsible for taking photos, object detection, and sending emails. It can be downloaded here as a word document. Download this document and save its contents as a python file on the R-Pi. The code has comments along most lines if you are looking for a more in-depth explanation. In this section, I will highlight some of the more important things to note. For future reference, I saved this python code as “photo.py” in the “/home/pi” directory. This is the same directory I keep the prototxt and model.
Important code notes:
Confidence level- Set the minimum percent confidence required to accept a detection as an object.
ap.add_argument(“-c”, “–confidence”, type=float, default=0.2…
Classes- Objects the neural network is trained to detect.
CLASSES = [“background”, “aeroplane”, “bicycle”, “bird”, “boat”, “bottle”, “bus”, “car”, “cat”, “chair”, “cow”, “diningtable”, “dog”, “horse”, “motorbike”, “person”, “pottedplant”, “sheep”, “sofa”, “train”, “tvmonitor”]
Enter your email address and password in these fields.
toaddr = “email@gmail.com”
me = “email@gmail.com”
s.login(user = ’email@gmail.com’, password = ‘password’)
External Timer
The R-Pi does not come equipped with an external mechanism that allows for complete shutoff and turn on. This results in inefficient power use which becomes unacceptable when trying to use a small solar panel. There are several power management options for us to consider. For example, the “Witty Pi 3” board is a user-friendly power management solution. It can be readily attached to the GPIO pins of the R-Pi and with two extra lines of code, you are ready to schedule shutdowns/startups. However, if you have some spare electrical components, we can create a cheaper alternative using the “OnOff SHIM”. The OnOff SHIM approach is discussed in this tutorial.
OnOff SHIM Installation
The OnOff SHIM will require some soldering to eventually become part of the larger timer circuit.
- First, I would recommend soldering on the 2×6 Female Header onto the SHIM for easy attachment onto the R-Pi.
- Alternatively, solder the Shim directly onto the GPIO pins.
- There are two additional connectors labeled “BTN” on the SHIM board. When these two connectors are short-circuited, they will cause the R-Pi to turn on or off. Solder a red jumper wire to the left connector and a black jumper wire to the right connector.
- Lastly, we need to boot the R-Pi and enter the following code in the terminal:
curl https://get.pimoroni.com/onoffshim | bash
![]()
![]()
![]()
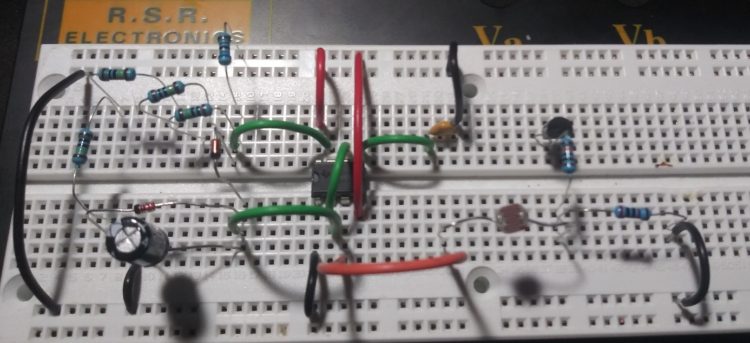
Hardware Timer
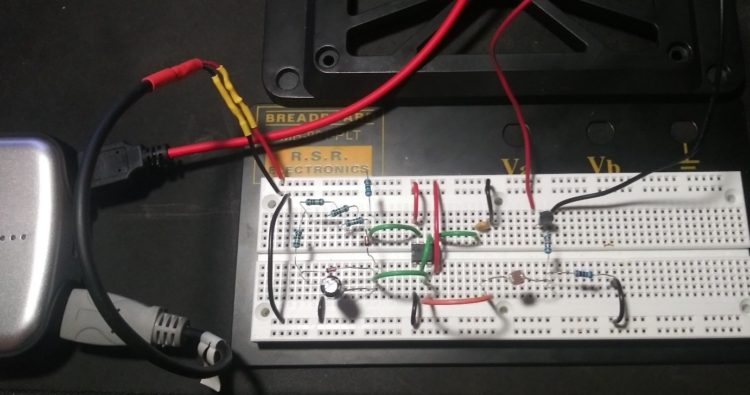
This version of the external timer will activate for 2 seconds every 30 minutes. The shutdown of the R-Pi will be taken care of on a software level. The schematic of the external timer as well as an image of my physical circuit is included below. The V25 USB Battery Pack provides the circuit with power via a stripped USB cable. The battery pack is also connected to the SHIM via a USB – MicroUSB cable which is included with the purchase of a V25 USB Battery Pack.
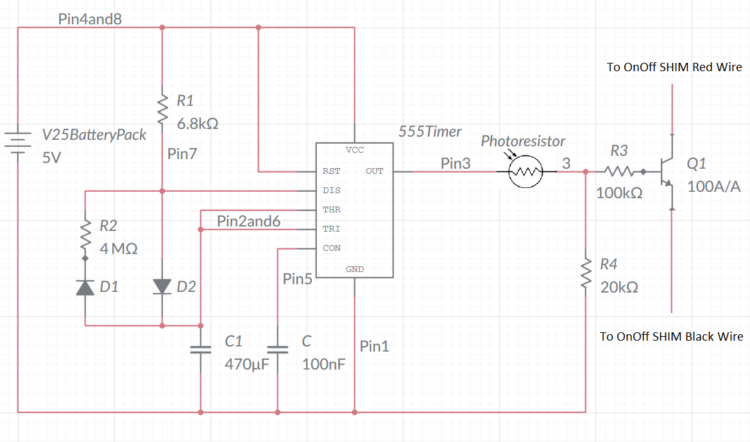
If you would like to make your own timings, you can use the following formulas to select a capacitor and resistor combination:
Time(on)= 0.8 * R1 * C1
Time(off)= 0.8 * R2 * C2
Remember to recalculate your power consumption when selecting new components. Be mindful that achieving timing intervals above 10 minutes tends to be very inaccurate with 555-timers. During my testing, components set for a 30-minute off interval yielded a 37-minute cycle. In the end, I set the components for a 25-minute off interval which resulted in a 31-minute cycle. This issue is usually caused by leakage in high-value electrolytic capacitors.
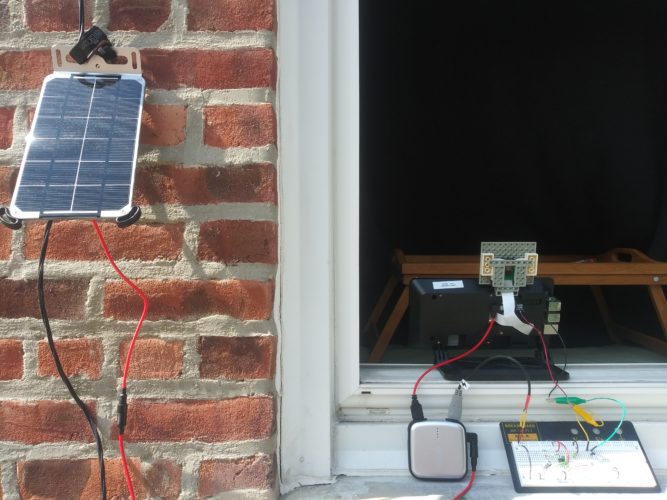
IMPORTANT NOTE: This schematic utilizes a photoresistor that will prevent the R-Pi from turning on in low light conditions. This means that during the day the photoresistor needs to be exposed to light to continue taking photos. I would recommend placing this circuit by a window with direct/indirect sunlight or in a transparent case if placed outside.
Cron Scheduling
The last thing we need to do is queue all the instructions in the R-Pi’s cron software. Cron will allow us to schedule scripts and instructions in a convenient time-based system.
To add items to the cron table, open the terminal and enter the following command:
sudo crontab -e
If asked to select an editor, select the nano editor.
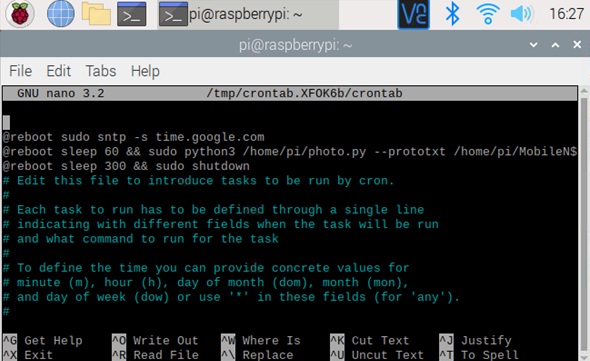
Now we will add the following three instructions at the top of the script:
@reboot sudo sntp -s time.google.com
@reboot sleep 60 && sudo python3 /home/pi/photo.py –prototxt /home/pi/MobileNetSSD_deploy.prototxt.txt –model /home/pi/MobileNetSSD_deploy.caffemodel >> /tmp/foo.log 2>&1
@reboot sleep 300 && sudo shutdown
Save these instructions by pressing CTRL + X and then Y.
The first command will instruct the R-Pi, on reboot, to immediately update its time. This is done by using the sntp command to synchronize the R-Pi’s clock to an NTP server such as the Google Public NTP server. Now the subject of each email will be labeled with the correct time.
The second instruction will run one minute after reboot. It will cause the R-Pi to run the photo script responsible for taking pictures and object detection. Make sure to include the full paths for the python script, prototxt, and model.
The last thing we add to the cron table is a shutoff command. My shutoff command is scheduled for five minutes after a reboot. I recommend at least a shutoff delay of five minutes so that you have time to access the R-Pi and disable the cron table code when you no longer want to run the project.
Final Thoughts
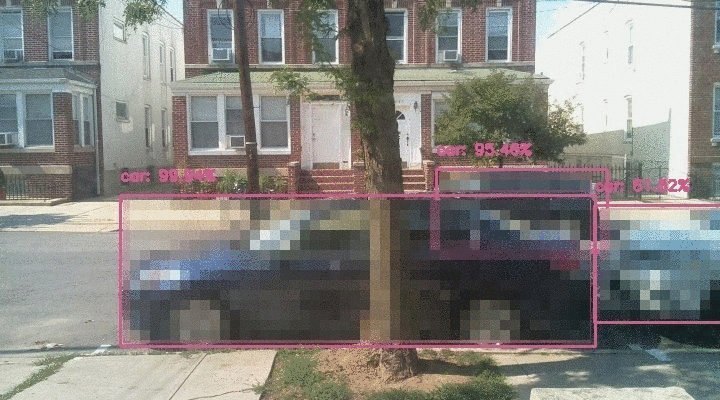
Keep in mind that the Single Shot Detection (SSD) method of object detection, used in this tutorial, is a middle ground between efficiency and accuracy. This means that the neural network is bound to make mistakes. To keep the frequency of these mistakes low, I would recommend providing a uniform background and removing obstructions from the camera’s view.
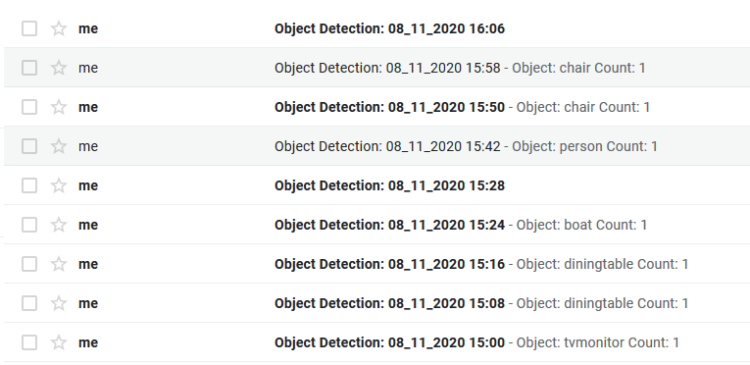
If everything has been done correctly your email address should get emails like the one below every 30-minutes. The email describes images taken by the R-Pi like the one shown in the thumbnail.
If you intend on placing the project fully outside, click here for another blog post detailing how to create your own weatherproof casing. I would also strongly recommend the “1010 Micro Case” made by Pelican or similar products for outdoor deployment.
Bio: Maksymilian Pikul is a recent electrical engineering graduate from Farleigh Dickinson University.
Leave a Reply